Tag Archives: movie

High Frame Rate 3D Demonstration

The document speaks to the technology but make no mention of what people thought after seeing the demonstration. Generally speaking it seemed very clear that the benefits of 48 frames to the eye was easily seen. Motion judder was eliminated. The picture looked more natural.

When 60 frames to the eye was shown, not only was the judder removed but the foreground ‘resolution’ popped out. In a sense, this is unnatural since when one is focused on a distant object the foreground objects are not focused. On the other hand, directing with focus is a tool that directors use. If the director doesn’t want to limit focus, it is nice that this resolution becomes available.

Report: 2010 Digital Captioning Symposium

2010 Digital Captioning Symposium

Fast forward sixteen years later. This week, I sat in the Washington, D.C. Digital Captioning Symposium presented by Regal Entertainment Group and National Association of Theater Owners. The symposium participants were representatives from deaf and hard of hearing organizations. In this presentation, we learned that movie theaters are quickly adopting digital projectors, which increases opportunities for movie theatre captioning for deaf and hard of hearing patrons. In considering a “personal captioning device” for a theater, there are five decisions that theater owners take into consideration:

  1. Ease of Use: Is the device intuitive for the patron? Is it easy for theater employees to manage set-up post installation?
  2. Maintenance: Can the devices be cleaned with ease? Are different parts easily replaced when they break?
  3. Privacy: Are the captions only seen by the deaf and hard of hearing patron? No distraction to neighbors?
  4. Depth-of-Field: Can captions be viewed without eye-strain? Can user view captions simultaneously with movie, or does the user read the captions up-close first, then view movie?
  5. Cost: Is it affordable for the theater to install and maintain as technology develops?

For the original of this article and links to the keen mobile apps, go to:
 Theater Captioning: Back to the Future | Keen Scene


Four Market-Ready Personal Captioning Devices:

With these in mind, we tested four different personal captioning devices for twenty-minutes each as we watched Disney’s “Game Plan,” and I’ll offer a brief summary of how they worked, and a few pros and cons. Note that this is my personal opinion, and not representative of the whole group or the deaf and hard of hearing organization that I represented (Alexander Graham Bell Association for the Deaf and Hard of Hearing).

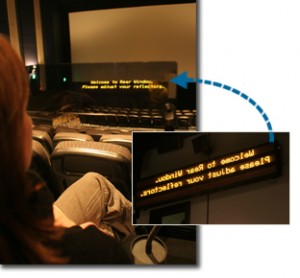
MoPix: WGBH Boston – Media Access Group Mopix Rear Window System shot

Better known as “Rear-window captioning” Motion Picture Access (MoPix), developed by The Media Access Group, part of WGBH of Boston has been in the market as a first-mover since 1997 and a reliable product.

How it works: An LED-screen is set up in the rear of the theatre and displays three lines of captions in reverse. The user has a transparent reflective plexiglass attached to a “gooseneck” stem that can be positioned in the cup holder. Once a user positions the plexiglass to the optimal angle of the LED screen and screen, captions can be superimposed on the screen.

Pros: The user does not have to worry about any technical difficulties (i.e., battery running out, not having a wireless signal). The depth-of-field is the same as the screen, so there is no eye-strain.

Cons: Getting the right angle and positioning can be challenging. Where you are seated in the theatre makes a difference. The closer you are to the LED screen and to the center, the better.

More Information: http://ncam.wgbh.org/mopix/

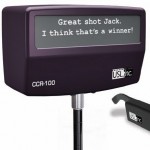
Infrared Closed Captioning System: USL, Inc. USL Captioning System Front End

How it works: Attached to a similar “gooseneck” arm as MoPix, a small box with a window displays two-lines of captions that are triggered by the infrared system. The user views the captions inside this “window” (black screen with white text) and then the movie screen.

Pros: The captions are available inside the “window,” so user can easily shift in seat and adjust the gooseneck accordingly.

Cons: Two different depth-of-fields: The user needs to read the captions up close first, then view the screen at the distance. So it creates some eye-strain. I positioned the gooseneck away from me and that helped just a little bit. Second, it is subject to technical difficulty with the wireless transmitter and battery life. (What if the theaterstaff forgets to charge it? or turn on infrared panel?)

More Information: http://www.uslinc.com/products-sound-CCS.html

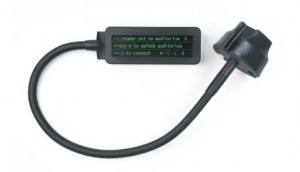
CaptiView: Doremi Cinema, Inc. Doremi Captiview Frontend

How it works: Attached to a gooseneck, a long, thin OLED panel holds three lines high-contrast captions, outfitted with a privacy screen so that users do not see the captions. (Not unlike the computer film you may put on your phone or laptops.) Captions are received via a wireless transmitter.

Pros: Easy to sit anywhere in the house and adjust positioning of display relative to the movie screen. Letter-boxed captions easy to read.

Cons: Depth of field is not the same as screen, but for some reason, did not bother me as much as USL’s Infrared Captioning System. Maybe it was because I was used to it by that point? Or perhaps the fact that the words were “closer” in the panel, rather than far back in the window.

More Information: http://www.doremicinema.com/PDF/CaptiViewSheet.pdf (PDF)

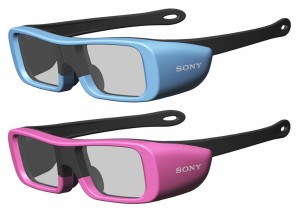
iGlass: Sony Sony Model of iGlasses for subtitles

This was interesting and different than the rest. It didn’t require a gooseneck device attached to a cup holder. So yes, I can bring in my soda and be able to easily reach for it! This product, developed by Sony, is in Beta, so I found a similar concept of goggles as you can see to the right.

How it works: Infrared panels transmit captions and user has a small receiver that are attached to a pair of seemingly futuristic glasses. Inside the glasses are clear “screens” that display captions straight out in front of you. (And yes, that means you may see captions on the wall if you turn your head to the side of the theater.)

Pros: Depth-of-field is the same as the screen. Can easily be superimposed on the theatre screen. Virtually no eye-strain. Glasses are consistently positioned on the face, so no need to re-adjust gooseneck when user moves around in the seat. Also, it’s not as conspicuous!

Cons: Just got a bit tricky with real-estate around my ears due to bilateral cochlear implants. But not a deal-breaker. Similar to USL, Doremi, there are areas for technical difficulty by the user.

What If…

It’d be interesting if there was an “invisible ink-” style captions actually part of the movie that can only be visible from a special pair of glasses? Or a similar projector from the back that displays captions on top, only visible to a specific type of lens? Any other ideas out there?

Progress, for sure!

It was an interesting day to test out all these devices and watch Disney’s  ”Game Plan” – Of course, with it being Disney, I almost had to reach for some kleenex when we reached the inevitable, predictable happy ending.  It’ll be interesting to see what the theaters roll out in the near future, and I think it’s sooner than we think. It’s definitely an improvement over what I saw at the last Personal Captioning Symposium hosted by Regal in 2006. Keep up the good work!

About the author

Catharine McNally is the founder of Keen Guides, which was formed to create more mainstream and accessible tourism experiences for everyone. McNally spends her efforts on user experience and design, video production and distribution, and staying ahead of the accessibility curve. You can follow Catharine on twitter (@cmcnally)

Open Source DCP Mastering

There are two threads on the RED User forum:

Digital cinema package – how i, a computer neophyte, made an open source dcp on my ma – REDUSER.net

This one has excellent data on preparing your audio and video materials: Digital Cinema Package – REDUSER.net

Film maker Chris Perry writes the A-Z on his site as well, which he recently updated: crumbs: Making a DCP entirely with open source tools (update)

Clyde has other articles on the site, one that explains Doremi’s CineAssist version 
Doremi’s CineAssist allows for in-house 3D DCP mastering

For a myriad of other DCinema best practices, especially focused on Stereoscopic 3D, see his blog:
http://www.realvision.ae/blog 

There are many restrictions in the open source model at this point. Alternative frame rates (anything other than 24 frames) is not easy…or perhaps not even possible if you don’t have a means of creating a JPEG 2000 version of your output…which is a requirement of the DCP. 

Knut Erik Evensen‘s site promotes his DCP mastering services and he also has an article on the open source capabilities, DCPC, a frontend to open source DCP tools.

Lars Reichel has a front end for DCP creation: Digital Cinema Package Creator

No matter how much reading you do, these techniques are not simple or for those without excellent computer skills. 

Still free, but possibly not open sourced, one cannot neglect the excellent work from the Fraunhofer Institute in Germany, centering a suite of products around easyDCP, easyDCP Creator, easyDCP Player and easyDCP Workflow Plug-Ins.

The sister company of the  Aussie integrators Digital Cinema Network is the developerment group digitAll, who have introduced the dcpPlayer for the desktop computer and are soon to release dcpEncoder. (digitAll is also a sister group to Cine Tech Geek, a great place to get practical demonstrations of digital cinema equipment and concepts.)

The State of Digital Cinema – April 2010 – Part Zero

What they came up with is called the tri-stimulus system since the primary idea is that there are nerve endings in the eye which act as receptors, some of which primarily deal with green light, some with red and some with blue. These color receptors are called the cones (which don’t work at all in low light), while the receptors that can deal with low levels of light are called the rods.

Now, for the first of our amazing set of numbers, there are as many as 125 million receptors in the eye, of which only 6 or 7 million deal with color. When (predominantly) only one type of these receptors gets triggered, it will send a signal to the brain and the brain will designate the appropriate color. If two or more of these receptors are triggered, then the brain will do the work of combining them much the same way that a painter mixes water colors. (We’ll pretend it is that simple.)

OK; so how do you create a representation of all that color and detail on the TV or movie screen?

Let’s start with film. We think of it as one piece of plastic, but in reality it is several layers that each have a different dye of different sensitivity on it. Each dye reacts in a different and predictable manner when exposed to light through the camera lens. In the lab, each layer goes through a different chemical process to ‘develop’ a representation of what it captured when exposed by the camera system. There are a lot of steps in between, but eventually the film is exposed to light again, this time pushing light in the opposite manner, through the film and then through the lens. That light gets colored by the film and shows up on the screen.

One of the qualities of film is that the chemical and gel nature makes the range of colors in the image appear to be seamless. And not just ‘appears’ with the definition of “gives the impression of.” In fact, there is a great deal of resolution in modern film.

Then TV came along. We see a smooth piece of glass, but if we could touch the other side of a 1995 era TV set we would feel a dust that reacts to a strong beam of electricity. If we look real close we will see that there are actually different color dots, again green, red, and blue. Engineers figured out how to control that electric beam with magnets, which could trigger the different dots of color to make them light up separately or together to combine into a range of colors, and eventually combine those colors into pictures.
That was great, except people wanted better. Technology evolved to give them that. Instead of lighting up magic dust with a strong beam of electricity, a couple methods were discovered that allowed small colored capsules of gas to be lit up and even small pieces of colored plastic to light up. These segments and pieces were able to be packed tightly against each other so that they could make the pictures. Instead of only hundreds of lines being lit up by the electron gun in the old TV set, now over a thousand lines can be lit up, at higher speeds, using a lot less electricity.

Then a couple engineers figured out make and control a very tiny mirror to reflect light, then quickly move to not reflect light. That mirror is less than 25% of the size of a typical human hair.

Hundreds of these mirrors can be placed next to each other on a chip less than 2 centimeters square. Each mirror is able to precisely move on or off at a rate of 144 times a second, which is 6 times the speed that a motion picture film is exposed to light for a picture.

This chip is called a DLP, a Digital Light Projector, because a computer can tell each mirror when to turn one and off, so that when a strong light is reflected on an individual or set of mirrors, it will create part of a picture. If you put a computer in charge of 3 chips, one for green, one for red and one for blue, the reflected light can be focused through a lens and a very detailed picture will appear on the screen. There is a different but similar technology that Sony has refined for their professional cinema technology which uses crystals that change their state (status).

Now for the 2nd in our amazing set of numbers. There are 1,080 rows made up of 2,048 individual mirrors each for over 2 million 2 hundred thousand mirrors per chip. If you were to multiply that times 3 chips worth of mirrors, you get the same “about 6 or 7 million” mirrors as there are cones in each eye.

Without going into details (to keep this simple), we keep getting closer to being able to duplicate the range and intensity of colors that you see in the sky. This is one of the artists goals, in the same way as the engineers want to make a lighter, flatter, environmentally better television and movie playing system. It isn’t perfect, but picture quality has reached the point that incremental changes will be more subtle than substantive, or better only in larger rooms or specialist applications.

For example, a movie that uses the 2K standard will typically be in the 300 gigabyte size. A movie made in 4K, which technically has 4 times the resolution, will typically be less than 15% larger. This movie will be stored on a computer with many redundant drives, with redundant power supplies and graphics cards that are expressly made to be secure with special “digital cinema only” projectors.

Hopefully you have a feeling for the basic technology. It is not just being pushed onto people because it is the newest thing. The TV and movie businesses are going digital for a number of good reasons. To begin with, it wasn’t really possible to advance quality of the older technology without increasing the cost by a significant amount…and even then it would be incredibly cumbersome and remain an environmental nightmare. There are also advantages of flexibility that the new technology could do that the old couldn’t…or couldn’t at a reasonable price or at the quality of the new.

The technology of presenting a 3D image is one of those flexibility points. 3D was certainly one of the thrills of Avatar. The director worked for a decade learning how to handle the artistic and the technical sides of the art. He developed with closely aligned partners many different pieces of equipment and manners of using existing equipment to do things that haven’t been done before. And finally he spent hours on details that other budgets and people would only spend minutes. In the end James Cameron developed a technique and technology set that won’t be seen as normal for a long time from now…and an outstanding movie.

Could Avatar have been made on film? Well, almost no major motion picture has been made exclusively on film for a long time. They all use a technique named CGI (for the character generated imagery), which covers a grand set of techniques. But if you tried to generate the characters in Avatar exclusively on a computer with CGI, they never would have come out as detailed and inspiring as they did. Likewise, if he tried to create the characters with masks and other techniques with live action, you wouldn’t get the texture and feeling that the actors gave to their parts.

Could Avatar have been displayed with film, in 2D. Yes, it could have and it was.

3D is dealt with in more detail in Part II of this series, but here are some basics:

To begin, 3D is a misnomer. True 3 dimension presumes the ability to walk around a subject and see a full surround view, like the hologram of Princess Leah.

In real life a person who is partly hidden in one view, will be even more hidden or perhaps exposed from another view. On the screen of today’s 3D movie, when a character appears to  b partly hidden by a wall as seen by a person on the left side of the theater, they will also appear the same amount of hidden by someone on the right side of the theater.

In fact, what we see with out eyes and what we see in the new theaters is correctly termed “stereoscopic”. We are taught some of this in school, how to make two lines join somewhere out in space (parallax) and draw all the boxes on those lines to make them appear to recede in the distance…even though they are on one piece of paper. There are several more clues in addition to parallax that we use to discern whether something is closer or farther, and whether something is just a drawing on a sheet of paper or a full rounded person or sharp-edged box…even in a 2D picture.

And we have been doing this for years. We know that Bogie and Bergman are in front of the plane that apparently sits in the distance…our eyes/brain/mind makes up a story for us, 3 dimensions and probably more, even though it is a black and white set of pictures shown at 24 frames per second on a flat screen.

Digital 3D is an imperfect feature as of now. It has improved enough that companies are investing a lot of money to make and show the movies. The technology will be improved as the artists learn the technology and what the audiences appreciate.

Although we are in a phase that seems like “All 3D, All The Time”, 3D isn’t the most important part of the digital cinema transition. At first blush the most important consideration is the savings from all the parts of movie distribution, including lower print costs and transportation costs. But actually, because prints no longer cost over a thousand euros, and because it will be simple to distribute a digital file, lesser known artists will have the opportunity to get their work in front of more people, and more people will find it easier to enjoy entertainment from other cultures and other parts of the world.

This Series now includes:
The State of Digital Cinema – April 2010 – Part 0
The State of Digital Cinema – April 2010 – Part I
The State of Digital Cinema – April 2010 – Part II
Ebert FUDs 3D and Digital Cinema