SMPTE ST-2095-1 is a new standard for Pink Noise. It took a great deal of work by a great number of clever people, a lot of listening and testing and tweaking. The cool thing is that it isn’t made with a lot of transiticators, but rather, with digits. This is THE Digital Pink Noise Standard.
Pink Noise has been one of those things that has always been around, and people don’t think much about it. Flick a switch, and there it is. But it took a sophisticated circuit to do right, and it wasn’t always implemented the same…or even well. That is much less likely now because with the standard is a python script that is very easy to implement.
The equipment that you rely upon may already use it. For example, the great audio tools set named Audio Tools from Studio Six Digital, has already implemented it.
But what if you just want to make some of your own? That is the point of this post – to give a few tips on how to create a usable Pink Noise .wav file using the python script that is delivered with the SMPTE Calibration Pink Noise Standard ST-2095-1…and with luck and permission, attached as a download here.
Since the programming language ‘python’ is installed as a standard part of the Mac computer, that is what you’ll see with the drawings and instructions following. There are also some pictures of the basic use of the Audacity, the free and Open Source audio tool. Audacity is available for Windows, but the pictures are from a Mac.
Just to be clear:
1) Python and Audacity are both freely available for Windows and Linux and Mac
2) Allowing for normal directory adjustments, the commands are the same whether used on a Mac or Windows or a Linux based computer. In Windows, of course, one uses the ‘cmd’ window instead of a ‘Terminal’, and one can’t use cut and paste on the Windows system as one can with Terminal on the Mac and Ubuntu (pointing out only one of several usable versions of Linux OS.)
Windows Python Installer: <https://python.org/downloads>
Audacity downloads are at: <http://web.audacityteam.org/download/>
1) Download the SMPTE Python File
One source is the SMPTE Documents website.
2) Prepare the Computer
On your Mac computer, in Finder, click “Command-Shift U” to go to ‘Utilities’ folder.
Drag the .py file to Utilities folder; authenticate with your password when asked.
While still in Finder, click “Command-Shift O” (O as in Opal) to go to ‘Documents’ folder.
Create a new Folder (Cmd-N) and immediately type “pink_noise”, then Return to name it.
Open the ‘pink-noise’ folder with Cmd-O or double click.
3) Using Terminal to Create Some Noise
Do “Command Spacebar”, then type “Terminal”. When ‘Terminal’ appears, click “Return”
In Terminal, type “python ” including a trailing space.
From the Utilities folder, drag the ‘ST-2095-1-generator.py’ icon to the Terminal window.
Add a space
From the top of the previously opened ‘/Documents/pink_noise’ folder, drag the folder icon to the Terminal window.
Add a slash bar and a file name for the pink noise file to be generated: e.g., “/48_10_1.wav”
The line should look something like:
python /Applications/Utilities/ST-2095-1-generator.py Documents/pink_noise/48_10_1.wav
Hit “Return”, then wait until the script tells you how long the process took and the RMS value.
Go to ‘Documents/pink_noise folder’ to see the new .wav file. Click once, hit Space bar to listen.
If you are unfamiliar with the techniques detailed above, all that dragging and dropping is used to avoid figuring out –and mistyping – the paths to the documents. Terminal is kind enough to let you drag a file and it fill in the data.
4) To Modify file duration, channel numbers and bit rate
In Terminal, click up arrow which brings up the previous command.
Hit left arrow to the Capital “D” in Documents. Type “-d 20 “, or the desired length in seconds.
Note the space. Make certain there is only one space in between the ’20’ and the ‘D’.
Hit the right arrow to 2nd underscore in the .wav file name. Hit “delete” 2 times. Type “20”.
Hit “Return” to create the 20 second file.
The following command will create a .wav file that has 6, 30 second channels of 96k pink noise.
python /Applications/Utilities/ST-2095-1-generator.py -d 30 -c 6 -9 Documents/pink_noise/96_30_6.wav
The six channels in that example will play simultaneously. To create a file that will play the channels consecutively, or to change the levels or add a Fade In or Fade Out, or trim the lengths (a 10 second request will create a file longer than10 seconds), it is necessary to use an audio editing program. While many are available, the examples used below are for the well regarded, free and Open Source program, “Audacity” .
5) To install Audacity
Open a browser page to: http://sourceforge.net/projects/audacity/
Click the “Download” button
Double-click on the .dmg file, which will open an Audacity Install window
Drag the Audacity folder to the Applications folder.
6) To Open .wav File In Audacity
In the ‘pink_noise’ folder, Right-Click or Control-Click on the .wav file
Roll down to “Open with”. Select “Open with Audacity”

Click “OK” to “Make a copy of the files before editing (safer)

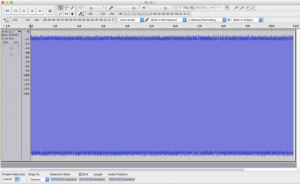
You should see a single channel of pink noise that is a little shorter than 22 seconds.
To Cut or Fade Out from 20 seconds, with the “I-bar” selected, click, hold and drag to the right.
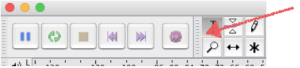
To Cut:
Leaving the last 1.8 seconds selected, hit ‘Delete’.
To Fade:
Leaving the last 1.8 seconds selected, pull down from ‘Effects menu’ (at top) to ‘Fade Out’
Click Command-A to select the entire track
To quickly add channels of the same modified sound:
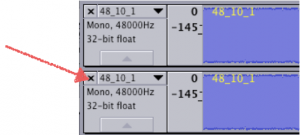
Click “Command-D” three times to create 8 channels
Click “X” in upper left corner of any track to eliminate one track.
Good practice, but not mandatory:
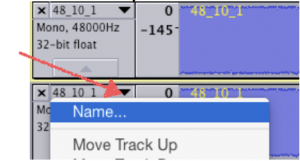
Name the channel by pulling down the box to the right of the ‘x’.
Note: The fourth channel will always be the LFE channel
7) To Sequence one track after the other
Click Cmd-A to select all the tracks.
Pull down the menu “Tracks” to “Align Tracks” to “Align End to End”
‘Click Cmd-F’ and ‘Shift-Cmd-F’ to get the entire set of tracks in the window.
Slip/Adjust tracks as desired.
8) To Export to broadcast WAV file use as .wav or for use as DCP
Pull down ‘File’ to ‘Export Audio’. (Cmd-Shift-E)
Name file as desired, but definitely change the name or directory.
In ‘Format’ pull down to ‘Other uncompressed files’.
Click ‘Options’;Select ‘Header: WAV (Microsoft)’; Encoding: ‘Signed 24 bit PCM’; Click ‘Save’
9) To make channels Rotate…and LFE play last (See N.B. following Technique)
In Advanced Mixing Options: Click the 2nd box down on left. It will get a red outline
Click ‘Channel: 3’ on right side. A connection will appear.
Click ‘Channel: 2’ on right side. Connect it to 3rd box down on left side.
Click on connection bar between 3rd box on both sides to remove it.
Do the same to swap RtSurr and LftSurr for Channels 5 and 6 – have real fun with 8 channels.

Click ‘Save’. The Next panel is metadata which is not supported in .wav files; Click ‘OK’
NB: This technique only works if all channels have identical signals! If, for example, the LFE channel were increased by 10 dB before the Export, following the above Export example will create a Right Surround that is 10 dB too hot.
10) Verifying the .wave file
Go to /pink_noise folder and open new file in Audacity using the “Open As…” technique described previously. If you merely double-click on the .wav file, iTunes will likely import it and play it for you.

This is what it should look like when complete. It will play out L, C, R, RtSurr, LftSurr, LFE
Now that the .wav file is open, filters can be applied or levels can be adjusted.
11) To add level to a channel
Select – carefully select – the audio portion of the track, then pull down ‘Effects’ to ‘Amplify’, then put in the number of dB to add (or -dB to subtract).
Do your best not to amplify the silence. But it is possible that you will not be able to avoid ‘grabbing’ a small portion of it.
You must export again to create a .wav file. When you “Save” in Audacity, you are creating an Audacity specific file set, not a playable .wav file.
But if you already have saved the .wav file so it plays channels in the proper order, then you don’t need to swap them on export again.
There is more potential in using the Audacity program, but this should serve the basic needs.
Please send document corrections or suggestions via the Contact Form. Thanks.
